Your First Line of Defence – Securing Your Mobile
Our first topic on securing your business may seem like an odd one, after all mobile phones aren’t really your primary way of integrating with a work-related network. However, with all security it’s necessary to look at potential weak point where your accounts can be broken into, and that is often your mobile phone.
To understand the importance of your phone, think about how you would recover a password from say your webmail account. Typically you would visit a website and say that your password is lost and the webmail operator would often send you a text message with a link to set a new password. An attacker that had access to your phone or your text messages, they could simply request the same SMS reset, change your password and you would be locked out and they would have full access. From there, the world would be their oyster! They could reset email accounts and from there banking passwords, business accounts etc. All that just from access to your phone.
This section aims to provide details on how to secure your phone and ensure that the weakest link isn’t the device you are most likely to lose.
Updating
Really there are 2 choices for you when buying a phone and that is iPhone or Android. The first thing to consider even at this initial purchase stage is will it be secure and for how long.
With the iPhone you have a safe bet that there will be security support well into the future. At the time of writing Apple has just updated a phone 5 years old to the latest version of it’s operating system. That is well past the average length of time a phone is kept, so an iPhone is pretty safe. It’s also worth noting that security updates happen on iPhones even after that.
Android phones can be a bit of a mixed bag. Some of the major manufacturers are now guaranteeing 3 operating system updates and security updates during this time. Google, guarantees OS and security updates for 3 years (Google, n.d.) on it’s latest Pixel phones which to be honest isn’t that great when you consider Apples doing twice that. Samsung now guarantee security updates for 4 years.
Samsung, Motorola and Nokia are generally pretty good for Android in that they offer similar guarantees to Google, but other manufacturers can be a bit spotty. We should also add here that all these manufacturers run customised versions of Android, so security updates might take a while to apply.
Unfortunately you can see where this is heading! Really if you want a phone that see’s regular security updates over a prolonged period of time, the iPhone is an obvious choice for you. If you will happily change your phone after 2-3 years, the choice is much wider. You should probably avoid some of the less well known manufacturers even though they often seem to offer great value for money. It really isn’t worth the risk if security updates only last a year (yes I’ve bought some of those myself).
I guess the other thing to mention is that once you see an update, particularly a security update, run it as soon as you can. The way an attacker looks at updates is that they can compare before and after code, work out what the problem is and use that to infect as many devices as possible in the time before the update is applied to fix a device. If you update early, the risk is therefore much lower. Again, unfortunately iOS has a big advantage over Android here. Apple updates are usually there and waiting the next day, Android updates can take weeks or months on none Google devices.
Your PIN – how secure is it?
Once you have settled on your phone, you will need to set up security. Most phones now have facial recognition, fingerprint sensors or both, and you should definitely set those up. However they also have a fallback to a PIN or pattern. Patterns are often guessable by looking at the smudges on the phone and there are typical patterns that people use (https://arstechnica.com/information-technology/2015/08/new-data-uncovers-the-surprising-predictability-of-android-lock-patterns/), so they may not as secure an option you may think.
PIN codes are also problematic because a 4 or 6 number PIN is just not long enough to guarantee security and again typical PINs are common (https://www.datagenetics.com/blog/september32012/index.html). You can see from this list that common PINs are single digits, easy to type sequences, birthdates etc. All sadly very guessable. In fact this was one of the things I had to change when initially writing this article. Although my PIN certainly wasn’t in the top 20, or even the top 100, it was definitely in the top 1000. The long and the short of it is that if you have a PIN code, it probably isn’t that secure. If you have one of the below, change it immediately!
| PIN | Freq | PIN | Freq | |||
| #1 | 1234 | 10.713% | #11 | 9999 | 0.451% | |
| #2 | 1111 | 6.016% | #12 | 3333 | 0.419% | |
| #3 | 0000 | 1.881% | #13 | 5555 | 0.395% | |
| #4 | 1212 | 1.197% | #14 | 6666 | 0.391% | |
| #5 | 7777 | 0.745% | #15 | 1122 | 0.366% | |
| #6 | 1004 | 0.616% | #16 | 1313 | 0.304% | |
| #7 | 2000 | 0.613% | #17 | 8888 | 0.303% | |
| #8 | 4444 | 0.526% | #18 | 4321 | 0.293% | |
| #9 | 2222 | 0.516% | #19 | 2001 | 0.290% | |
| #10 | 6969 | 0.512% | #20 | 1010 | 0.285% |
Many phones will have a setting to wipe the phone after 10 unsuccessful password attempts. That seems like a secure option, but as you can see from the above, a lot of peoples PIN numbers are very guessable and there are techniques available that interrupt that reporting back the unsuccessful password attempt (Cellebrite, n.d.). Essentially that means infinite attempts in an automated system that can guess multiple times a second. The result is cracking a PIN in “no more than 13 minutes for a 4-digit passcode, 22 hours for 6 digits, and 92 days for 8 digits. The default length prompted by iOS is 6 digits.” (World Socialist Website, 2020).
When thinking about our PINs we are really going back to the early days of smartphone when we all tended to use short PINs because that was all that was available, and you had to enter it multiple times a day to unlock your phone. However in a world of facial recognition and fingerprint sensors, that is no longer the case. To make your phone far more secure swap your PIN for a password and make it reasonably long, maybe a short sentence with capitals and numbers. That will make your phone almost impossible to crack within a reasonable lifetime even with advanced hacking software like Cellebrite.
The way to do this with an iPhone is simple, when you know how, but weirdly well hidden.
- Go to Settings, then do one of the following: –
- On an iPhone with Face ID: Tap “Face ID & Passcode”
- On an iPhone with a home button: Tap “Touch ID and Passcode”
- Tap “Turn Passcode On” or “Change Passcode”
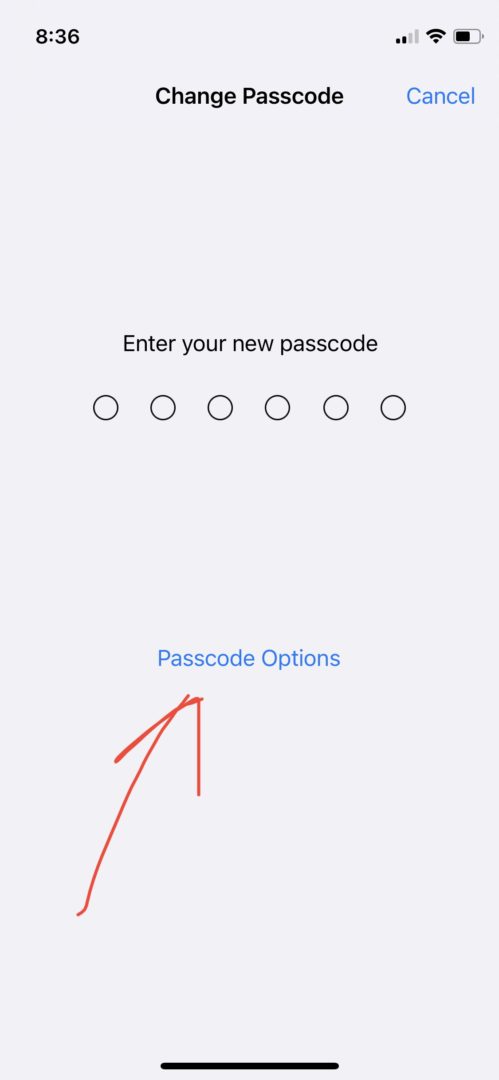
- After you have added in your old passcode, you will probably see the typical iOS 6 digit PIN and number pad at the bottom (see image 1)
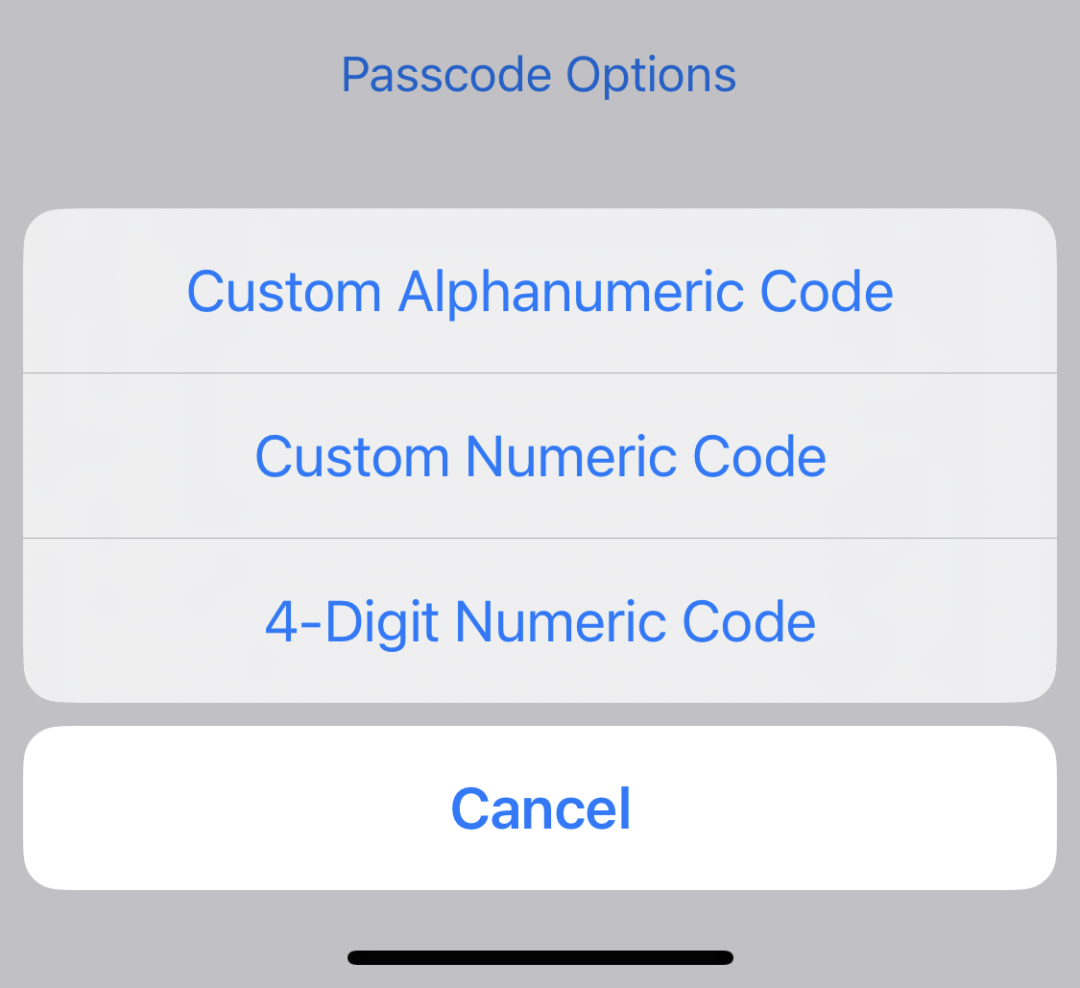
- Tap the “Passcode Options” and you should see the options as shown in image 2
- Tap the Custom Alphanumeric Code option and type in your new password.
- While you are in this area, check to make sure you have “Erase Data” switched on, so that 10 failed attempts at your passcode will erase your phone data.
Having lived the “Alphanumeric” life for the past 6 months or so, I can tell you that you hardly notice the difference. For the vast majority of the time FaceID or TouchID do the unlocking, and you only every need to enter your password very occasionally.
I should note here that there is strong integration between an iPhone and an Apple Watch, so you should similarly strengthen your Apple Watch security. That is a more painful experience, so you might like to take the alternate approach of switching off mobile network coverage, so that if your watch is lost, it’s hopefully out of range of your phone and can’t receive reset text messages. Alternatively, just buy the cheaper Apple Watch!
On Android the change from a PIN to a password is more obvious. Although note that depending on the version of Android and the phone you have, this procedure may be different.
- Go to settings, then tap “Security and Location”
- In the Device Security section tap “Screen Lock”
- Enter your existing PIN and you should be taken to a “Choose screen lock” menu
- Tap Password
- Agree that this password should also be used for Secure start-up, then set your password.
Why is this so important? Well the fallback security method in all cases is that PIN, so if you have set your bank, password manager or authenticator app to use say Face ID and your camera is covered, it will ask for your PIN instead, so an easy-to-guess PIN opens up every app you want to keep secure on your phone.
Restrict Access to Messages
Another convenience that is also a security issue is that ecosystems such as iOS often let you access messages, from other devices. So it’s important to make sure that you have similar PIN/Password setting security on other devices or if that’s too much of a problem (say it’s you child’s iPad), then check your iPhone settings to make sure verification messages are only appearing on your device: –
- In iOS go to Settings then scroll down and tap Messages.
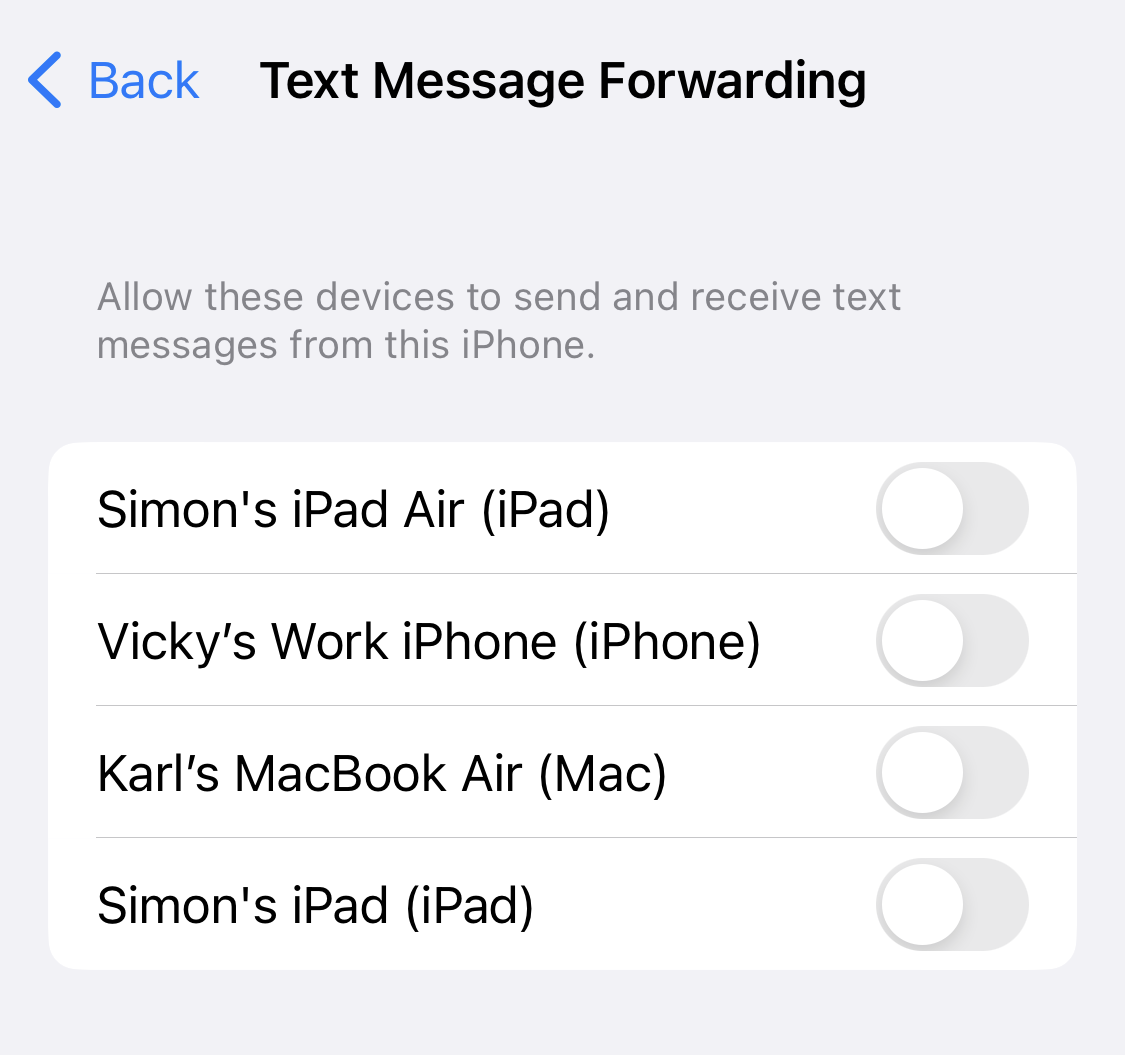
- Tap “Text Message Forwarding”
- You should see a similar screen to the below (image 3). Make sure all of these are off and your recovery messages will only appear on your phone.
- While you are here, go to Settings, Phone and make sure “Calls on Other Devices” is off so that recovery calls can’t be picked up on other devices.
- Lastly, and this one can be a bit of an inconvenience, you need to make sure messages that may reset accounts aren’t visible via a notification when the screen is locked. To do that go to
- Settings
- Notifications
- Scroll to Messages
- Scroll down to Lock Screen Appearance and make sure Shows Previews is set to “When Unlocked”. You still get a notification that you have received something, but you can’t read exactly what it is until the phone is unlocked.
Password Managers – an essential tool
Ok, so I am going to say the unthinkable. I would rather change browsers than change my password manager. I really think that much of them. What do they do? It’s really all in the name, they allow you to: –
- Store all your passwords in one location.
- Have access to your passwords in a way that you only ever have to remember the password to your password manager.
- Set long, strong and non-repeating passwords easily for any site.
Most people not using password managers choose a potentially insecure method of setting passwords. They either have a standard password they use on almost everything, or they have a technique that used a standard password part and something that is customised to the site. For example in Google they might choose the password “MyPasswordOnGoogle”.
Both of these methods of choosing passwords are fundamentally flawed if ANY sites you use are compromised. If you use a standard password and that becomes know, it’s very likely hackers will try that password on other sites. Even worse, if the email associated with the account is say a Gmail account, they will likely try the password there too. Once you lose control of your email, all bets are off as they will be able to reset bank passwords and more using your email as verification. A password technique that includes the site name would suffer from the same issues.
These days you are very likely to have your email address on 2 or 3 sites that have been compromised, so you can see how important it is not to duplicate passwords. Don’t think these need to be small sites that are compromised either. Yahoo, Adobe, Optus and many other large corporations have been compromised. Recently, T-mobile in the US had a data breach for 50 million customers (CSO Online, 2021 ). This included names, date-of-birth, email, phone numbers, social security numbers, driver license numbers etc. The Optus hack currently in the news is very similar. In other words everything needed for identity theft and to apply for credit at other locations. If you have the same password on that account as you have used elsewhere, you can be sure that there will be compromise attempts on other accounts you own too. Don’t think large companies are any more secure than the smaller ones when it comes to protecting your security, they may have more procedures in place, but as we know, they are bigger targets and all companies can make mistakes and leave account details open.
Password managers are a great solution to the problem of password management though now have some add on features such as: –
Automatic generation of long, strong passwords
Phishing protection as a password manager won’t be fooled by lookalike domains that are often used to try to get you to login to a fake site so that they can steal your password details
- Automatic password completion on a site.
- Secure note storage
- Secure file storage
- Secure password sharing
- Security alerts on compromised accounts
As a business, secure password sharing is a great feature. It allows you to give others access to sites, without giving them the password. These features can come at a cost, but it is generally small and well worth it.
Recommended password managers include: –
- Lastpass
- 1password
- Dashlane
- Bitwarden
- Apple’s keychain – which is now available cross platform as long as you are a Chrome user (Apple, n.d.)
There are now moves to create a passwordless login system based on your mobile phone. This will help significantly with password management, as essentially you won’t need to have passwords to manage. This will take time to roll out, but in the meantime, get a password manager, they are one of the few things that both increase your security and convenience.
Account Data Breach Checking
One of the features of many password managers is that they check the dark web to make sure that your account hasn’t been involved in a data breach. Lastpass include this feature in their Security Dashboard, Dark web monitoring section as an example. What they will do is look at all the email in your account and check to see if they have been involved in any known data breaches. They actually check email against the “have I been pwned” site (have I been pwned, n.d.) databases.
Have I been pwned is a site that has been around a long time and is maintained by Troy Hunt (a Gold Coast resident). As good as the email checks through a password manager is, as a business it’s a good idea to know more about the business domain, and that is where the “have I been pwned” site has some great features. The Domain search (https://haveibeenpwned.com/DomainSearch) feature is invaluable for business. It allows you to add in your business domain name and your email address, it will then monitor your domain and let you know if any email in that domain has been compromised. Even better this is a free feature on the site.
If you do see a notification email from the have I been pwned site, it very important to jump on it quickly and either change the password for the site you have been warned about, or delete your account on the site if you are no longer using it.
Securing Your Mobile Part 2!
At this point I’m realising that this article is pretty long and we still need to cover SIM Jacking, Authentication Apps and Security Keys. That means a part 2 next week!
Summary
A quick summary of the above: –
- Update your phone as soon as updates are available
- PINs are the fallback method of identification and are not secure enough. Change your PIN for a password. With face and fingerprint security taking over most of the time it’s only a slight inconvenience for a massive bump in security
- Limit access to text messages that may include reset codes for accounts
- Get yourself a password manager, one of the few devices that make security more convenient
- Check your domain for compromised accounts using https://haveibeenpwned.com/DomainSearch
- Read next weeks article on SIM Jacking, Authentication and Security Keys! I had to add that one!