Webxopt

Turn a Website into a Business

T 07 3103 3259
M +61 409 825 759
E info@webxopt.com

  • Home
  • Why Us?
  • What We Do
  • B2B Websites
    • Case Study
  • REST API
  • Cybersecurity
  • Consulting
  • Articles
  • Contact
    • Privacy
    • Help Page

AliCloud (Aliyun) Server Crashes Fixed with the Help of Site24x7

May 18, 2025

An Australian client company with a subsidiary in China had set up hosting on AliCloud (Aliyun) for their local website. Since set up the site has had many outages usually during the night Australian time and was having to be rebooted most mornings. 

We used Site24x7 website monitors (https://www.site24x7.com/website-monitoring.html) to keep an eye on the server and notify of any outages. That became depressing reading as despite scouring logs, we could not find any events or events that triggered the outages: –

Site24x7 website monitor of AliCloud server showing the site outages we had problems with

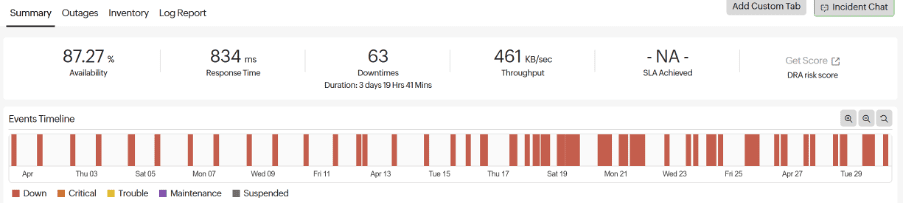
You can see from the above that in a month the site was down nearly 13% of the time, usually at night, but the frequency seemed to be picking up.

We knew that the server had way more capacity than should have been required, as we had a very similar site running in other locations on AWS servers with far less resources, but we were struggling to find what was causing all these crashes.

Site24x7 also includes server monitors for various server types (https://www.site24x7.com/server-monitoring.html), which with a bit of work on the Linux command line are easily installed (https://www.site24x7.com/linux-monitoring.html). 

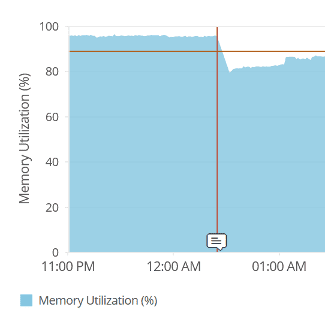
Looking at the end of the month you can see the unhappy state of the server, which is always teetering on the border of failure. What this monitor did tell us though was exactly why. CPU was trickling along at a few percent, but memory was nearly always maxed out, and the crashes occurred at memory peaks, when the memory usage hit 95%. That was despite the fact the server had 2GB of RAM and WordPress was set to use 128MB of it: –

Site24x7 Server Monitor showing the physical memory usage and outages
Site24x7 monitor showing memory and a server crash illustrating that the memory peaks before the server crashes.

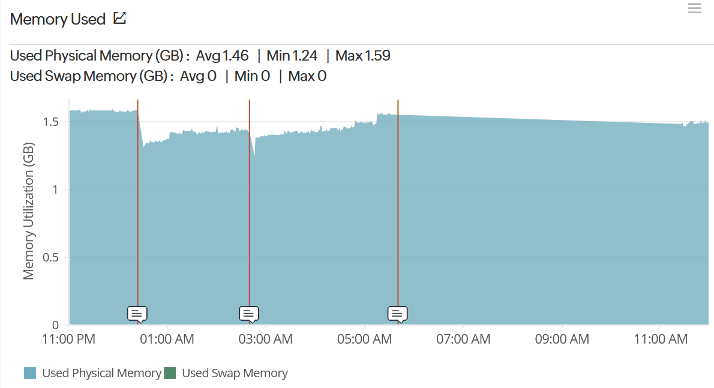
Another graph in the server memory area showed the memory used and included both the Used Physical Memory and Swap Memory. You can see from this graph below, that swap memory was not being used at all.

Site24x7 Server monitor showing that the used swap memory was zero.

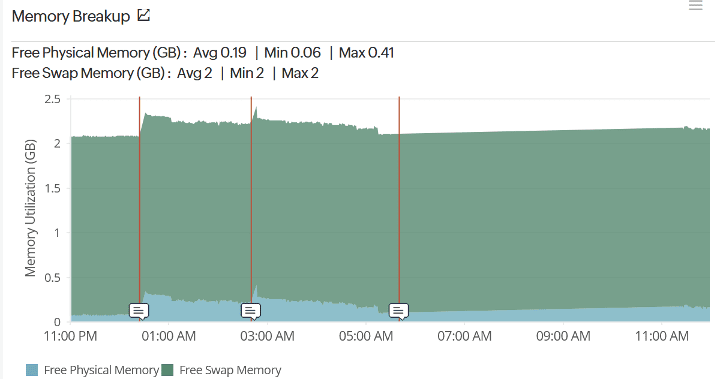
Although swap memory wasn’t being used, we could see that it was available from the Memory Breakup graph (below). You can see here that there is a full 2GB of swap memory available but unused at almost all times.

Site24x7 Server monitor showing that there was free swap memory available, although it was not being used.

Solution

  1. As root, use “swapon –show” to see if the swap file is on. In my case this confirmed that the swap was there which confirmed the finding of the Site24x7 Linus monitor.
  2. As the swap memory is there and we have 2GB allocated, that must mean that the AliCloud/AliYun install has the swap file correctly configured, just not switched on! To all the server to use this memory we need to adjust the “swappiness” of the server.
  3. You can find what swappiness is set using “nano /proc/sys/vm/swappiness” and even better adjust it using “sudo sysctl vm.swappiness=50” (I found 50 to be a good number, but you can adjust to suit).
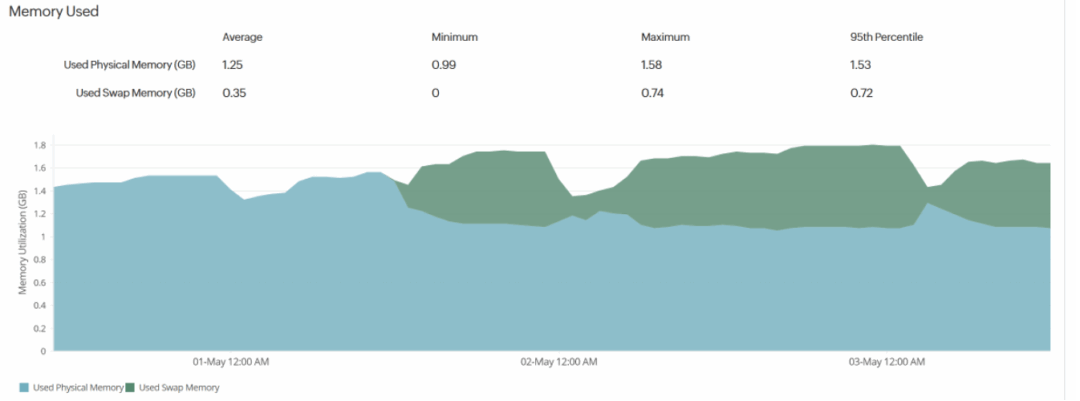
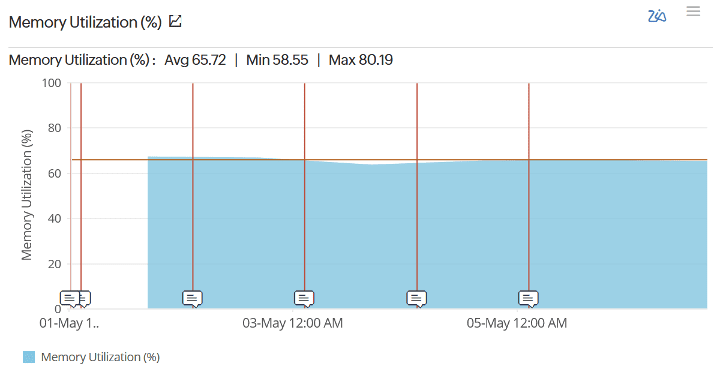
  4. Leave this running for a few hours and see if you see the swap memory increasing in the site 24×7 monitor. In my case I saw that happening within minutes, and the physical memory usage dropping dramatically as a result. In my case you can see how quickly that had an effect below. Note that the physical memory usage dropped to around half of what we were often running previously. You can also see that crashes stopped.
  5. The last thing to do is to ensure that the swappiness always sets to that same value, in my case 50, on every reboot. To do this, you need to edit the “sysctl.conf” file in the “/etc/” folder. Add the line “vm.swappiness=50” and save the file.
Site24x7 Monitor showing the activation of virtual memory after swappiness had been set.

Result

The results have been dramatic. The only outages we have seen are planned reboots I had in place to restart the server in case of failure (now switched off): –

Site24x7 report showing the reduced number of outages on the AliYun Server after the swap file had been activated.

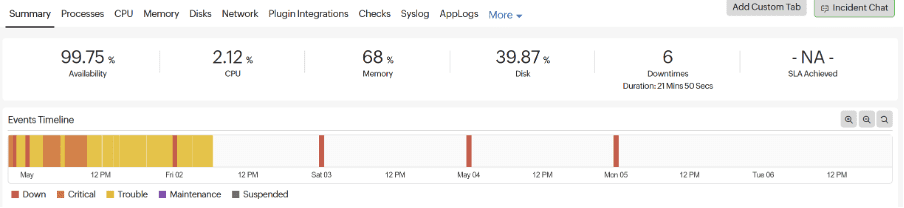
Physical memory usage is now averaging about 65%, so we have plenty of available capacity, which is why we are seeing no crashes. Previously we had averaged around 85% usage.

Site24x7 memory usage graphs showing reduced usage of physical memory after swappiness was set

The likely cause of this issue is a misconfiguration of the Ubuntu machine image on Alicloud. This simple solution fixes that issue, and the result is the fast machine you know is there. 

I should recommend the Site24x7 Linux Server monitor (https://www.site24x7.com/linux-monitoring.html) too. Without seeing the Site24x7 reports I would not have found this issue or been able to implement a fix so easily.

Filed Under: Articles

S/MIME Certificate – Sectigo Usage

May 26, 2023

Basis convert CollectCCC and private key into .pfx file for upload to a mail service, like Zoho Mail.

  • You will receive a “CollectCCC” file from Sectigo which seems useless and there are no real instructions on how to convert this into a usable form.
  • When you sent Sectigo your CSR (Certificate Signing Request), you should have generated your public and private key pairs, along with the request. In my case I used WHM (part of cPanel) to generate the CSR and that gave me all certificates in text form too. Just copy the private key, which should start with “—-BEGIN RSA PRIVATE KEY—–” and end with “—–END RSA PRIVATE KEY—–” into a text file and save this as yourdomainname.key (you can actually call it whatever you like .key). You now have the 2 files you need to create something useful
    • CollectCCC
    • yourdomainname.key
  • What you will need to do the conversion is a copy of openSSL. You can install this on Windows, but IMHO it’s easier and safer to get Windows Subsystem for Linux and say Ubuntu: –
    • Windows Subsystem for Linux from the Microsoft Store
    • Ubuntu 22.04.2 LTS (or the latest LTS release)
  • Follow any online guide on how to install these.
  • I’m not sure if this comes with open SSL as standard, so type “sudo apt install openssl” into the terminal, it will prompt you for the admin password you set up, then install openssl.
  • Now you have to get your certificates into Linux to be able to use them. I just had mine in my windows system Downloads folder, so this will assume yours are there too
  • In the linux terminal you need to copy the CollectCCC file and the yourdomainname.key into your Linux system. Probably you can do this all in the Windows folder, but IMHO it takes less writing if you move them in.
  • Firstly make a directory (docs) which I did as follows: –
    • sudo mkdir /usr/docs
    • You may need to enter your admin account password for Ubuntu to use sudo, if you haven’t already.
  • Then go into that directly
    • cd /usr/docs
  • Now copy the files from the Windows Downloads folder into that folder
    • sudo cp /mnt/c/Users/[your windows username]/Downloads/CollectCCC /usr/docs
    • sudo cp /mnt/c/Users/[your windows username]/Downloads/yourdomainname.key /usr/docs
  • Now run type ls to list the files and you should see these have copied over
  • Now for the OpenSSL magic! In the terminal type the following
    • sudo openssl pkcs7 -inform der in CollectCCC -print_certs -out CollectCCC.pem
      • You will need to enter any password you used when creating your CSR before uploading to Sectigo
      • This will convert CollectCCC into a .pem format which the next stage can use.
    • sudo openssl openssl pkcs12 -export -out certificate.pfx -inkey yourdomainname.key -in CollectCCC.pem
      • The result of this should be a new file called certificate.pfx (to see it, type ls into the terminal)
  • Next you need to move the pfx file back into Windows using
    • cp certificate.pfx /mnt/c/Users/yourdomainname/Downloads
      • You should now be able to go back to windows and see your newly created pfx file in the downloads folder
  • Lastly copy this pfx file into your mail system. In mine I just had to drag it into Zoho mail admin, Users, S/MIME, then hit the “+” button and making sure I had the right email account selected (! yes I didn’t do that first time). You should then be asked for the password, which is the one you set up when sending in the CSR, and you should be good to go!

Holy moly, this could have been made a lot easier by Sectigo! It seems to me that their priority is to sell their installation services by making it extremely difficult for a user to install their own. Having said that, I’m not sure others are any better either!

Filed Under: Articles, Uncategorized

Cybersecurity for Australian Small/Micro Business – Networks 2 – DNS

December 10, 2022

This one has been a long time coming! To be honest networking is not my strength. It’s one of those areas where I wish I’d been a network admin to work out some of the practicalities of different network models, but here goes anyway!

DNS - the worlds connection

DNS

DNS is short for Domain Name System. Essentially it’s the same principle as the address book in your mobile phone. Rather than you having to remember all the phone numbers of the people you know, you can just look up their name, tap a button and you are instantly phoning them. You may be one of the people that take pride in memorising peoples phone numbers (if they still exist), but imagine for a moment that your address book contains millions of names, that would be pretty much impossible.

The DNS system does the same for the internet, it takes the domain name you enter, or click on in a search, and converts that to a server address that the network and routers that are tasked to get you to the site will actually understand.

To give you an example of this, we all know google.com, but would you remember it’s IP is 142.250.217.110 (when I checked anyway, but yours may be different – use https://www.site24x7.com/find-ip-address-of-web-site.html to find out). You can enter that IP directly in your web browser and you will end up at Google. It’s a lot easier remembering google.com though.

So what has this got to do with security? Well you can imagine that if a malicious person was substitute their own entries into DNS, they could send you anywhere they wanted rather than to the site you were expecting. For example you could change google.com to point to 40.89.244.232, which is duckduckgo.com. Arguably this would be a better choice, but it’s not where you wanted to go. Now imagine if you could create a fake bank site and send someone to login to that rather than their actual bank. All of a sudden the person being attacked has just handed over their bank username and password to the attacker!

DNS can also be a great security measure to stop phishing attacks. There will be more of this later, but imagine a smart DNS system that could check a link you just clicked and say “STOP, that site is potentially malicious”. Even more than that, online advertising can be a source of malware too. DNS can block that for you.

Recommendations for DNS

The great thing about DNS is that you can set where these addresses are looked up on your router, so you can protect your network and users just by moving from default DNS settings that probably your ISP controls to something a bit more secure. There are loads of options you can consider, and I won’t be able to go into all of them here. I would encourage you to do some digging around for yourself though.

DNS servers that deserve special mention though include: –

Open DNS – These are one of the first providers I became aware of and used for some time. Their Prosumer small business account on https://www.opendns.com/home-internet-security/. You can see that they offer many of the features mentioned above.

Pi-hole (https://pi-hole.net/) – A role your own solution which requires you to have a small raspberry pi based system on your network. This gives you amazing control of your DNS and your network in general, for the amazingly low price of free, plus the cost of the raspberry pi and the cost to power the device.

Synology NAS DNS Server – I must admit that I’m a bit of a Synology fanboy! They provide some great hardware and software combinations that are hard to beat. I haven’t played with the DNS server system available on their NAS, but it would be a good combination if you are already running their system for storage (more later).

NextDNS (https://nextdns.io/) – For me, NextDNS hits the mark! It has all the features we mentioned above and a few more besides. It’s easy to protect your mobile devices when you are out on the go using their straightforward app, their privacy policies seems to be solid and it’s really cost effective (https://nextdns.io/pricing). For me, I can get away with the Pro account that costs just US$30 per year! That’s a real bargain for what it offers.

As you can probably tell, I am an NextDNS user, so the next section will go through the settings I use for my account: –

NextDNS Features

First things first. If you chose to use an online DNS system, you need it to be fast! There’s no point in picking a secure system, if each DNS query (and there are a lot of them) is so slow, your whole network slows as a result. If you go to the bottom of the NextDNS homepage at https://nextdns.io/, you will see a map and an indication of the response time for a DNS query. Make sure your on a reasonable network and check to see there’s a server near you and that the response time is quick.

Once you have created an account, there’s an array of settings, some of which are on by default and others not. Settings to note, and that’s essentially all of them, include: –

  • Use threat intelligence feeds – these are lists of known malware that are updated in real time. You need this one on.
  • AI driven threat detection – although I’m not sure how this could work, I have it switched on anyway!
  • Google Sage Browsing – Google looks at millions of websites per day and identifies any that are unsafe. Switching this on will use Googles list and block access to these sites and will not allow bypassing of this block (which you can do in the browser).
  • Cryptojacking protection – Enabling this will stop your device being used to mine (generate) cryptocurrency.
  • DNS Rebinding Protection – this stops your device from obtaining data from other devices on your network. There’s a great description of DNS Rebinding at https://www.paloaltonetworks.com/cyberpedia/what-is-dns-rebinding, but it’s safe to say, you want it on.
  • IDN Homograph Attacks Protection – This uses similar but different letters to the genuine domains to make it look like you are logging onto an known website, when really you are logging in elsewhere.
  • Typosquatting Protection – This is similar to the above, but is based on common misspellings like fcaebook.com instead of facebook.com.
  • Domain Generation Algorithms Protection – Blocks domains generated often by malware so that the malware can “phone home” for control information.
  • Block Newly Registered Domains – This one of not on as standard, however I have it switched on. It blocks domains that have been registered less than 30 days ago. This can be a problem if you are say in the business of generating websites, but my experience is genuinely positive in that I don’t see many false positives. Newly registered domains are often used in phishing attacks etc.
  • Block Child Sexual Abuse Material – turn this on!

Heading into the privacy settings there are also some useful things to switch on. In my system I have NextDNS blocklists switched on which is the default, but click on the “Add a blocklist” button and you can also add other lists too from a huge range they have available.

I have not got native tracking protection turned on, but you can block tracking for Windows, iOS, Amazon Alexa, Samsung etc. I have an iPhone and I know the standard lists already blocks a lot. You have to give them something for their ‘free’ software I guess!

Blocking third party trackers disguising themselves as first-party is a good idea, but can give you some odd results if you are a web developer like me. I have it switched on though.

Lastly on this page is the setting to Allow Affiliate & Tracking links. You often see these for product reviews etc and I would guess that NextDNS strips off the tracking component, usually added after the ? in the url. This one is a difficult one! If you look at a lot of reviews before buying, it might be a good things to switch on and allow these, as it means the person writing the review will at least get paid for their work. Be careful though with this setting as unlike the others you switch it on to allow the links.

Parental Control Settings

You may think that parental control settings are not applicable to small business, but there are some useful settings in here that are not available elsewhere and can be used to improve your security. Before I go further though a lot will depend on what you have on your network and how you set up Next DNS.

If you set up NextDNS on your router, it will affect ALL devices on the network and any guest networks you set up. So if you have personal devices that may want to access content that you don’t want on work devices, you have probably to use NextDNS on a per device level, which is a shame as you lose it’s security and tracking benefits on other devices. So if you feel the need to use the type of security where sites and access are limited, you have to think carefully about your network segmentation.

So what are the main features of the parental control section? You can block specific or broad categories of apps and sites. Why is this a good idea? It’s not about your staff wasting time when they are supposed to be at work, it’s more about securing yourself from data exfiltration IMHO. Blocking access to things like Signal, Telegram, Messenger etc., may stop an attacker that manages to get into your network, or staff sending out data so that they can access things later on.

The other great setting in Parental controls is the ability to Block Bypass Methods. Essentially that tries to stop people trying to bypass all the controls you have set up in NextDNS. If you have a child at school, I’m sure you’ve heard of all the ways they try to get around schools sometimes overly restrictive filtering policies.

Deny and Allow Lists

These are self explanatory. However you may find that you need to add sites to the Allowlist that you might not necessarily want on there if sites don’t work as expected. For me for example, I had to add a bunch of Google domains so that I could access and use Google Analytics.

Analytics

This is the frightening bit! It gives an overview of exactly what is happening with your web requests. It also gives you the information you need to tweak your settings so the NextDNS works for you. The following is an overview of just one device on my network for the last 7 days: –

Next DNS Analytics
Next DNS – Analytics

As you can see, there’s a lot of domains that are queried by Apple on an iPhone. On the blocked side on the right hand, NextDNS is blocking some icloud metrics, a bunch of what I assume to be in-app analytics tracking and a company called appsflyer which I must admit I hadn’t heard of, but also seems to be in-app analytics.

If you are experiencing problems in apps, this is a good place to look as you may need to add some of these to your allow list.

The other section in here that I find good to review is the map at the bottom of the page. This shows which countries internet traffic goes to. You can mouse over different countries to see what is going there.

NextDNS - Traffic Destination
NextDNS – Traffic Destination

Here you can see that at some stage this iPhone accessed an unexpected domain in Russia. This was actually a time server, so nothing to be concerned about, but you can imagine that if you see a large amount of traffic going to an unexpected country, you can block it in the Deny List.

Settings

I’m going to skip over logging at the moment as really you need to change some settings first. For a business I believe that it’s important to log, but not to use those logs for anything other than security. If you think you have a staff member that’s on social media all the time when they should be working. Talk to the staff member and maybe block social media in the parental settings, don’t look for evidence of what they have been doing in the logs. If you use logs wisely they will not be seen as infringing privacy, they will be seen as the security measure that they should be.

In settings I therefore have logging enabled and log both the clients IP and the domains. That way if a system does get hacked, you can trace that back. The retention period you set really depends on you. Mine is set to 3 months, but considering that a network intrusion may mean someone has been on your system a significant amount of time (sometimes over a year), you may want to extend that. My rule-of-thumb theory for 3 months is that its a long time for a relatively small business holding no state secrets!

I chose to hold data in the EU, just because their privacy controls are the strongest.

Other settings that are useful are setting up a block page. That shows the users what has happened if they just get a blank page (and it has happened).

One that I’m not sure about is Rewrites. This is a useful feature for many businesses when they can use NextDNS to route traffic to say internal subdomains. For example, if I had an intranet (which I don’t) and used an external service to provide that which had a url of say https://simonsintranet-wghdfwh.xyz123.com you may want to rewrite that to say https://intranet.webxopt.com. Much easier to remember for your users. However this comes with a down side. If someone breaks into your NextDNS account, they can redirect anything to anywhere! Make sure you add your 2 factor authentication to minimise the chances of this happening! I’d love to see NextDNS limiting this to say higher level accounts, or even creating a ‘super-admin’ that gives access to this feature but leaves it off the normal interface.

Lastly, assuming that you have set up your account correctly in settings you will see all DNS queries going through the system…and there will be a lot of them! You can search by device, use the search box to find particular urls, limit the results to blocked queries etc. I’d like to see a date range search in here too, but I guess as it’s only used occassionally, a bit of scrolling is ok.

How to Use NextDNS

The things I like most about NextDNS is that you can cover both your network and the devices that are used outside your network. My recommendation would be to add NextDNS to your router settings. That way all DNS goes through them, but you can just install on a per device basis. NextDNS provides instructions, but setting up on a router can be tricky! Don’t forget though to add their app you all devices that may go outside the network. That way they are still protected.

Does it Work?

The short answer is YES!

I have had 3 cases where people on the network had been tricked into clicking a link they shouldn’t have. In all cases NextDNS blocked the queries and they didn’t end up on the phishing sites they clicked on.

Next Article

The next article, we will take what we know from our router and look at segmenting your network. This is a really important step in keeping your work devices separate from everything else.

Filed Under: Articles, Cybersecurity for Small Business

Cybersecurity for Australian Small/Micro Business – Networks 1 – Routers

November 11, 2022

Router

It has been a long road to this article! Knowing where and how to start, when this was the area I skipped over the most in my reasearch paper at Griffith Uni., has been a difficult thing to do. However, I finally realised that we should start at the start, and that’s the first and probable the most important piece of networking equipment, your router.

Routers

The router is likely the first piece of networking equipment we have as a small business. It is either separate from a modem, or you may even have a modem that connects into your router.

So what does a router do? Essentially, it’s all in the name! A router sends web traffic to or from a computer on your network. It’s what knows that when you request a web page in your browser, that it should send that to your computer and not to someone else’s. Routers however do many more things than that and are an vital part of your network security and performance. They block traffic that hasn’t been requested, stopping attacks and can segment your network for improved security (more later).

Routers also control our WiFi, which, if you are like me, is the way I handle my networking, as it’s just easier to do than running cables and is usually ‘fast enough’ that personally, I don’t need the hassle of running a super quick cabled connection. However, we will look at cabled networks later too.

The first thing to consider is the router you should use. When I joined my Internet Service Provider (ISP), they helpfully supplied a free router. My first rule of routers is that you should instantly put this to one side and go and buy something a bit better yourself. Why would you need to do this? Firstly because it is unlikely to be powerful enough to handle small business traffic and secondly, because it will not have many of the security features you require (and is often configured to allow your ISP into your network, which is a recipe for disaster).

Buying a Router for Business

I mentioned above that an ISP supplied router probably isn’t powerful enough for small business, so what exactly do I mean by that? The graph below shows the problem.

This looks a bit scary, but actually it’s quite simple. As more connections to the router are made, from either multiple or single machines, you move from the “Comfort Zone” into the “unresponsive” zone. This essentially means once you get past a certain point, no matter what the manufacturer or ISP claims, the response time will start getting worse and worse, your network will get slower and your work will become limited by the speed of your network.

So, not all routers are equal in other words. A cheap, low powered router typically supplied by an ISP might even offer WiFi 6e (latest at the time of writing) but will have a low end processor, that will run out of capacity quickly and likely put you in the “unresponsive” zone. They will still likely be outperformed by an older router with a higher end processor in a small business situation.

Routers I would recommend for small business, can still be bought at your local electrical store or Amazon, but may cost you a few hundred dollars, but they are worth it…really! A few hundred dollars down will make your life as a small business so much easier! I would recommend routers such as: –

  • Synology RT6600ax – a great small business router with strong security features (the router I personally want)
  • Ubiquiti routers – Amplifi
  • ASUS RT-AX routers or similar
  • Netgear Nighthawk
  • Palo Alto Networks – Okyo Garde (I just like this one because of the security features, but have no experience with it)

Personally I have an ASUS router that I have found to be super fast and has a lot of the features I need built into their software. Yes I want the Synology RT6600ax and may consider an upgrade in the near future for it’s stronger security and network segmentation features (more later).

Router Configuration

I am not going to go through general router configuration, as they are usually pretty straight forward these days. However, getting back to security, there are a few rules you should follow: –

  • Disable uPNP – this is a feature filled with security flaws that should never be enabled, or even allowed space on routers!
    Disable uPNP
  • Disable access from outside your network. However convenient it may seem, accessing your router configuration from outside your network is asking for trouble. Just disable it and sleep better at night!
    Disable Remote Access
  • Change your routers default password. This one goes without saying.
  • Activate auto update. Yes, the better routers update their software, and surprisingly often. Many routers allow you to set this to happen automatically at night so you don’t need to check for updates yourself.
    Auto Update Firmware
  • On a busy network, I would also set the router to automatically reboot every night to clear caches, find the optimum channels to operate in etc.

I would also encourage you to have a look around your router settings. On my ASUS I have enabled some antivirus checking (although could be a potential privacy concern) using AiProtection which is a service from Trend Micro and is free on the ASUS router I use. This isn’t blocking a lot if I’m honest, but it has blocked about 300 requests in nearly 3 years of operation. This isn’t my only protection that blocks malicious urls, but it is worth switching on anyway. I did mention above that there was a potential privacy problem. Essentially it isn’t clear what information Trend Micro gets and how they use it. If your work involves some sensitive sites or downloads, it might be better to switch this off and mitigate the risk of malware or scam risks using network segmentation.

Another useful router feature for security is to also enabled logs so that I can see traffic to individual systems. From a security point of view, this means you can potentially see changes in traffic that might mean data is being extracted from your system.

Traffic through router shown over the month

As you can see from the above, there was a large peak in traffic from 2/11 to 4/11. Looking at the client list shows that this relates to a new PC, which was updating and downloading some content. Looking more closely at that PC, I can see some of the bloatware that was removed after installation, and some that I now know I should remove (Clash of Clans).

At a later date you can see that there is an unknown client on the network that downloaded a significant amount at 19-20h. As it happens I know what this was, but this is the type of information that is useful to be able to see. Also it’s very important to keep an eye on uploads which may indicate that data is being taken out of your network.

Router Data Usage of ‘Unknown’ Device

Using Your Router for Security

Apart from network logging, which as you can see for the above, is very useful, there are also other great features of most routers you can use for security. My favourite of these is looking at device lists and from those identifying devices where you segmenting your network.

The most obvious example of network segmentation is the ability to create “Guest Networks”. The Guest network is a great thing! You can totally isolate devices on the guest network from your business devices on another network. This leaves things you can’t control isolated from things you can. I’ll give a couple of examples of guest networks for you to set up.

IoT (Internet of Things) Network

If you are like me you probably have voice assistants, health monitoring devices, TVs, cameras etc that all need an internet connection. Many of these probably have old software that can’t or won’t be updated by the manufacturer. These are an attackers paradise!

Getting into your network via a security camera, may not seem likely, but it’s a typical way in for many attackers. Probably the most famous IoT attack was a Las Vegas casino which got hacked via a WiFi fish feeding device on their network.

We can learn from their mistake and make sure that all our IOT devices are isolated away from our business operations by setting them to all connect to an isolated guest network with access only to the internet.

Visitors Network

If your business or even your home often has visitors that need or want access to the internet, a visitors network is a great way to isolate their ‘uncontrolled’ devices from your business network.

If you have kids like me, you’ll know this problem well, when a friend of theirs comes over and wants to get on the internet as their mobile plan is running low, or they want to do their homework. They are more than likely using devices that are not well maintained or updated, may have ‘free’ versions of paid for software (which often come with extras you really don’t want), and at the very least, you do not know whether their device is a security concern or not.

This is an ideal case for a guest network. Why take the risk of potentially giving them access to your business machines if you don’t need it? Set up a guess network and just give them access to the internet connection they want.

Device List (Network Map)

This may seem like an interesting, but relatively useless section of your router software, but it is really the key to many areas of security and the network segmentation we mentioned above and protecting your business by segmenting your network into business groups (and non-business groups).

What does a network map do? It lists all the devices connected to your network. This will be your key to a lot of other network security we look at into the future, so it’s worth taking the time to look at it closely.

Network Map

You can see my network here with 13 devices connected at the time. I have blanked out the names and MAC addresses for my safety, but the icons might give something away! You can see too that my router has divided the devices nicely into the 2.4GHz. 5GHz and a Guest Network.

What you will see in the clients names area is either the name of a device you recognise (eg your phones name) or a series of letters and numbers. The first thing you need to do is to be able to identify every item on this list. Those odd jumbles of letters and number are a computers way of identifying an individual item. This is what’s known as the MAC address, but as is, it’s pretty useless to you, so you need to translate that into something that you, as a person, can easily identify, like “Steves Laptop”. There are a couple of ways to do this. The first is to go through devices you know are on the network, but you can’t identify from the list and look for their MAC address in their settings. For example you can check MAC address: –

  • On a PC in Settings, System, Network & Internet, click on the network you are connected to (WiFi or ethernet/wired), select your network, in the Properties section you will see Physical address (MAC)
  • On an iPhone the MAC address is known as your WiFi address. To find it go to Settings, General, About and you should see the WiFi address.

Obviously this way has some issues as it can be quite time intensive for a larger number of devices. Personally, the approach I like to take is a bit more draconian! I warn everyone that I am about to cut off devices on the network where I do not know what they are, then I use the router controls to cut them off. Weirdly on my ASUS router, that is really easy to do on their mobile app, but I have yet to find similar controls on the desktop. As people jump up and down wanting their access back, you can go through the device list on your mobile, switching things on and off so that when they do get access, you know what you have just switched back on again. Take this time to adjust your router with a name for the device that you will recognise. This is again easy to do. In the case of my ASUS router, via their app.

In reality a hybrid approach to identifying devices connected to your network is probably best. Identify those you know are there using the MAC address method and those that you aren’t sure of by switching off their access. What I have found is that once you have done this once, keeping an eye on your network via a mobile app and just switching off access to anything new you don’t recognise is a good practical approach.

Exporting Device List

Another useful feature often found in a routers device list is an export feature. Make sure you do this and you should get a list that you can open up in Excel of the devices on your network. Please do this as it will be the starter for the next article on network segmentation.

Note that you might need to check this list a number of times as things go on and off your network on some routers. Others may keep a list of all devices that connect.

Summary

This has been a quick look through routers and their security options. As a summary: –

  • Don’t use an ISP supplied router. Buy something more powerful.
  • Disable uPNP and access from outside your network
  • Change the default password
  • Enable auto updates if this feature is available
  • Use router based security unless there is a privacy reason not to
  • Enable traffic logging to see unusual patterns
  • Move your IoT devices and any home devices to separate guest networks
  • Run through your devices list to identify all devices on your network
  • Export the devices list for use in the next steps

The next article we will start to use the device list downloaded from your router to think about segmenting your network and keeps tabs on these devices to make sure they are not a security risk. We may also consider some additional router level security to protect all devices from malicious websites and links.

Filed Under: Articles, Cybersecurity for Small Business

Cybersecurity for Australian Small/Micro Business – Mobile, Part 2

October 19, 2022

Part one of Securing Your Mobile looked at updating, your PIN, restricting access to messages, password managers and account breach checking. This week we are going to look at “SIM Jacking”, Authentication Apps and Security Keys.

Once you have been through these 2 articles and changed your phone settings accordingly, you will be A LOT more secure. Note that I’m not talking here about securing your device from attacks and spying on you as a person, but more protection against identity theft, leading to business account compromises.

After this week we will begin to look at devices on your business network.

SIM Jacking

SIM Jacking is similar to hijacking in that the criminal takes something that is yours, in the case your SIM card of your phone, and acquires it for themselves. This allows the criminal to receive all your calls and text messages including password resets sent to your mobile.

In practice SIM jacking has been far more common that the attacks mentioned in the part 1, which relied on your device being stolen, or lost. The advantage that SIM jacking has for criminals is that they can do it perform the attack from their home, or even another country, so there is little risk to themselves.

So how is SIM jacking typically carried out? This tends to be a “social engineering” attack. All that means is essentially that the attacker will do something like phone up your mobile phone provider and try to convince them that they are you, and that you have lost your phone and need a new SIM card. If they are convincing enough, the provider, being eager to help, will send a SIM card out and the attack is complete. There are also ways to bypass even this by using SMS online service providers to link up with your number. Essentially though the attacker wants access to your SMS messages so they can reset accounts and lock you out.

The good news is that many Australian phone companies are now waking up to SIM jacking and have started requiring a PIN number to grant access to your account (Telstra PIN). You have probably received notification about this if you use Telstra. If you have a business, make sure you set this up ASAP. There are instructions for doing this at https://www.telstra.com.au/support/account-payment/what-is-telstra-pin.

Although I’m not a customer, Optus at the moment does not seem to have a similar system to the Telstra PIN. I may be wrong here and please correct me if I am. However, I really hope that if they don’t have this protection, they get are acting quickly to require it, like Telstra.

It’s worth noting here that the same rules for creating a PIN that were mentioned in part 1 apply here too. Whatever you do, don’t pick a PIN from the top 10 list, your birth date etc etc as they are way too easily guessed. The most common PINS, and therefore the ones to avoid are shown again below: –

PINFreq  PINFreq
#1123410.713% #1199990.451%
#211116.016% #1233330.419%
#300001.881% #1355550.395%
#412121.197% #1466660.391%
#577770.745% #1511220.366%
#610040.616% #1613130.304%
#720000.613% #1788880.303%
#844440.526% #1843210.293%
#922220.516% #1920010.290%
#1069690.512% #2010100.285%
Common PIN numbers

Finally, for some interesting reading about just what damage can be done with SIM jacking, with little risk to the attacker, have a read through the below: –

  • https://www.news.com.au/finance/money/costs/sydney-couple-lose-37k-after-leaked-class-list-exposes-them-to-scammers/news-story/3082fae1f9087364fdfaaf0b7cbdd8ef
  • https://www.simprotect.org.au/

Authentication Apps and Devices

One common way that is often offered to secure your online accounts is 2-factor authentication.

Firstly we need to discuss what 2-factor or even multifactor authentication actually is. Traditionally we have always used a username and password to identify ourselves to websites. This is what is know as a single factor, the factor being your password, or “something you know”.

To verify further you are who you say you are we need other factors. These typically take the forms of: –

  • Something you are
  • Something you have

There are now other factors starting to be considered like “somewhere you are” and “something you do”, but those are not yet in normal use.

Typically at the moment we use the “something you have” factor and that is typically your mobile phone. You prove that you have your phone often by receiving a text message (less secure) or using an authenticator app.

You might also see some companies using the “somewhere you are” factor too. You have noticed this through services like Google, warn you if someone has logged in from a new location, and Lastpass which will actively prevent you from logging in if they have concerns your location is not somewhere they have seen before.

Authenticator Apps and Usage

There are quite a few different authenticator apps available for both iPhone and Android Phones. Common ones include: –

  • Google Authenticator
  • Microsoft Authenticator
  • Twilio Authy
  • Lastpass Authenticator
  • Zoho OneAuth
  • Duo etc.

The basic functionality is all pretty much do the same thing though. Allow you to scan a QR code (or enter a code manually) to set up the second factor. The authenticator app will then generate a 6 digit code that changes every 30 seconds which you need to enter into the site you are signing into. Because the code changes every 30 seconds, it is not something that you can guess and so it proves that you have the device with you and that you are you.

Once you have your code set up, logging in is as simple as using your normal username and password, then you are asked for the 6 digit PIN generated by your app.

There are a couple of issue with authenticator apps on your phone and they both really relate to the same thing. If you are signing into a service on your phone, there’s a good chance that the something you know and something you have are actually on the same device. For example, if you use Apples keychain to sign into a device, and that requires a 2nd factor, the factor is on the device that is signing you in, so really all you have is a single factor, something you have. For this reason it is very important to use a phone secured with a strong password, and make sure you have FaceID, TouchID or an App specific PIN set up in your authenticator app.

That said, if your phone password is compromised, you would still be in trouble, so my advice would be for important accounts like email, use your authenticator on a second phone or Security Key that you maybe keep in a drawer and is not commonly used.

For larger companies with multiple employees that need access to the second factor, managing this can be a real problem. I know multiple companies that do not tend to set up two factor authentication, despite knowing the risks, just because of those painful calls and messages as you are trying to get the second factor before the login attempt times out. For those applications there is a solution…security keys.

Security Keys

A security key, or multiple security keys are by far the best way of securing your accounts with Multifactor authentication. What is a security key? They often look like USB drives as shown below

Yubico Yubikey 5 Family

These security keys are from Yubico (https://www.yubico.com/), the leader in the field. You can see that hey are available with  USB-A, USB-C and Lightning connectors and some are available with NFC wireless connections. There are even some that have fingerprint readers built in to give you yet another factor.

Security keys are used to authenticate against the FIDO2 standard most commonly and dramatically cut down successful attacks on those accounts (Google says to zero). The only problem is, many things you sign into, are not compatible FIDO standards, such as a typical WordPress website.

Yubico’s solution is to build into the key an authenticator system that relies on an outside app (Yubico Authenticator) to generate one time passwords.

Having used a Yubikey for the last 6 months, I am convinced that the Yubico Authenticator offers not only a workaround solution for one time passcodes, but a superior way to manage small business 2nd factor authentication. This is because multiple Yubikeys can be set up with the same authentication codes. So the solution is: –

  • Buy at least 2 Yubikeys. One will be for the business owner and the other for “the office”
  • Download Yubico Authenticator to all devices
  • Add the second factor codes into both Yubikeys for all accounts
  • The office Yubikey can be kept in a central location, maybe attached to a tracking device so it can be found if lost.
  • If an office worker needs to log into account that requires authentication, they can fire up Yubico Authenticator on their device, plugin in the Yubikey to generate the code to login, then return the key to a central location. No calling round and hoping the person with the phone isn’t busy, just a simple, secure login process.
  • Why the second key with the business owner? In case the first key goes missing!

Google also supply their own security key, but the industry standard is the YubiKey (https://www.yubico.com/) as it supports the most devices, the most authentication methods and was the first device of its kind.

If you really want to be sure that your logins are secure or manage your 2nd factors more easily in a small business, get a security key!

Summary

A quick summary of the above: –

  • Secure your phone from SIM jacking using an account PIN.
  • Use 2 factor authentication wherever possible when signing into an online account (typically you’ll find the option in Settings, Security).
  • For easier management in the office and a more secure 2 factor sign in experience, get a couple of security keys such as a Yubikeys (https://www.yubico.com/).

Next week we will start to look at network devices including routers, switches, Network Attached Storage (NAS) and more.

Filed Under: Articles, Cybersecurity for Small Business

  • 1
  • 2
  • 3
  • Next Page »

Recent Posts

  • AliCloud (Aliyun) Server Crashes Fixed with the Help of Site24x7
  • S/MIME Certificate – Sectigo Usage
  • Cybersecurity for Australian Small/Micro Business – Networks 2 – DNS
  • Cybersecurity for Australian Small/Micro Business – Networks 1 – Routers
  • Cybersecurity for Australian Small/Micro Business – Mobile, Part 2

Advanced Help

Enter your code in here. You will need to contact me first for a code!

Simon Griffiths in San Francisco

Webxopt was formed in 2009 by Simon Griffiths, who was at the time working as the Marketing Manager of a medium sized company in the electrical industry. Simons background includes study of both … Read More

Awards – Graduate Certificate in Cybersecurity

Robina Town Centre - Webxopt

Webxopt Pty Ltd
PO Box 16
Robina Town Centre
QLD 4230, Australia

T 07 3103 3259
E info@webxopt.com
ABN: 24 624 264 951

© 2025 · Webxopt · Built on the Genesis Framework