Webxopt

Turn a Website into a Business

T 07 3103 3259
M +61 409 825 759
E info@webxopt.com

  • Home
  • Why Us?
  • What We Do
  • B2B Websites
    • Case Study
  • REST API
  • Cybersecurity
  • Consulting
  • Articles
  • Contact
    • Privacy
    • Help Page

S/MIME Certificate – Sectigo Usage

May 26, 2023

Basis convert CollectCCC and private key into .pfx file for upload to a mail service, like Zoho Mail.

  • You will receive a “CollectCCC” file from Sectigo which seems useless and there are no real instructions on how to convert this into a usable form.
  • When you sent Sectigo your CSR (Certificate Signing Request), you should have generated your public and private key pairs, along with the request. In my case I used WHM (part of cPanel) to generate the CSR and that gave me all certificates in text form too. Just copy the private key, which should start with “—-BEGIN RSA PRIVATE KEY—–” and end with “—–END RSA PRIVATE KEY—–” into a text file and save this as yourdomainname.key (you can actually call it whatever you like .key). You now have the 2 files you need to create something useful
    • CollectCCC
    • yourdomainname.key
  • What you will need to do the conversion is a copy of openSSL. You can install this on Windows, but IMHO it’s easier and safer to get Windows Subsystem for Linux and say Ubuntu: –
    • Windows Subsystem for Linux from the Microsoft Store
    • Ubuntu 22.04.2 LTS (or the latest LTS release)
  • Follow any online guide on how to install these.
  • I’m not sure if this comes with open SSL as standard, so type “sudo apt install openssl” into the terminal, it will prompt you for the admin password you set up, then install openssl.
  • Now you have to get your certificates into Linux to be able to use them. I just had mine in my windows system Downloads folder, so this will assume yours are there too
  • In the linux terminal you need to copy the CollectCCC file and the yourdomainname.key into your Linux system. Probably you can do this all in the Windows folder, but IMHO it takes less writing if you move them in.
  • Firstly make a directory (docs) which I did as follows: –
    • sudo mkdir /usr/docs
    • You may need to enter your admin account password for Ubuntu to use sudo, if you haven’t already.
  • Then go into that directly
    • cd /usr/docs
  • Now copy the files from the Windows Downloads folder into that folder
    • sudo cp /mnt/c/Users/[your windows username]/Downloads/CollectCCC /usr/docs
    • sudo cp /mnt/c/Users/[your windows username]/Downloads/yourdomainname.key /usr/docs
  • Now run type ls to list the files and you should see these have copied over
  • Now for the OpenSSL magic! In the terminal type the following
    • sudo openssl pkcs7 -inform der in CollectCCC -print_certs -out CollectCCC.pem
      • You will need to enter any password you used when creating your CSR before uploading to Sectigo
      • This will convert CollectCCC into a .pem format which the next stage can use.
    • sudo openssl openssl pkcs12 -export -out certificate.pfx -inkey yourdomainname.key -in CollectCCC.pem
      • The result of this should be a new file called certificate.pfx (to see it, type ls into the terminal)
  • Next you need to move the pfx file back into Windows using
    • cp certificate.pfx /mnt/c/Users/yourdomainname/Downloads
      • You should now be able to go back to windows and see your newly created pfx file in the downloads folder
  • Lastly copy this pfx file into your mail system. In mine I just had to drag it into Zoho mail admin, Users, S/MIME, then hit the “+” button and making sure I had the right email account selected (! yes I didn’t do that first time). You should then be asked for the password, which is the one you set up when sending in the CSR, and you should be good to go!

Holy moly, this could have been made a lot easier by Sectigo! It seems to me that their priority is to sell their installation services by making it extremely difficult for a user to install their own. Having said that, I’m not sure others are any better either!
Filed Under: Articles, Uncategorized

Load Page Data into Gravity Forms

June 26, 2021

One of the things I’ve always wanted to do was to be able to load data from a page into a Gravity Form so that instead of having to make multiple forms, you can have one form and just load content from the page. That makes both the form and consolidating data far simpler.

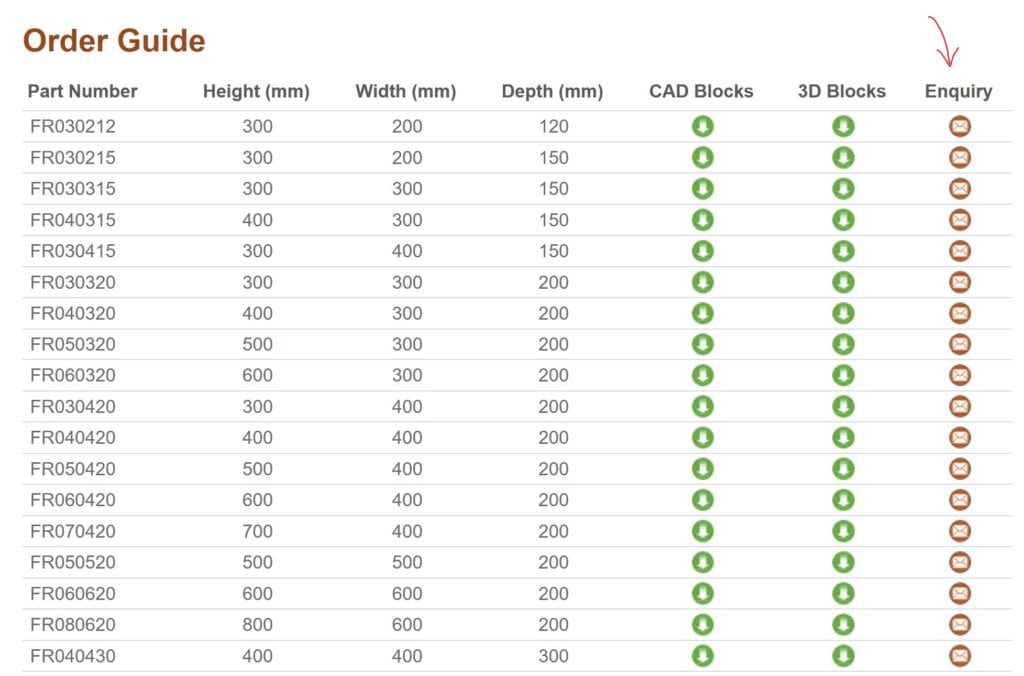
The type of forms this is good for include enquiry forms where there are lots of products on a page and perhaps accessories too. In the case I was looking at, the site had over 100 product groups, each with multiple products and accessory ranges. In the past, we had used separate forms for the popular products and loaded them in a modal box after clicking an icon in the product table: –

This obviously meant that each form had to be individual and created with all the products and accessories. That’s a lot of work to both create and manage.

The new approach is a single Gravity Form that dynamically loads in both the product and the accessories, so the form is less complex and a single form can cover all products.

NOTE: Before you go any further, this will not work well if your product needs conditional logic to say match an accessory with the product. Once you start adding in conditional logic like that, the form starts to get very confusing, very quickly. Instead if you do need to do that you can clone the form and add your conditional logic to the new form only.

The particular site I was looking at used 2 approaches to collect the data need for the form. One method was to just read the data from the page using jQuery, the other method extracted the accessories from a variable in PHP. For a standard WordPress installation, probably the first method is what you would want to go with. The second method was just easier!

Read Gravity Forms Article

The place to start is reading Gravity Forms article on this subject as https://docs.gravityforms.com/using-dynamic-population/ and https://docs.gravityforms.com/gform_pre_render/.

The first technique we are going to use just simply extracts the part number from the table line that has been clicked and therefore only uses the first of those Gravity Forms posts.

Extracting Page Data From Clicked Line

Step 1

Firstly I need to set the scene of this particular application. The product tables are stored in tablepress and in this case the form opening is initiated using a fancybox modal box. Therefore in a table similar to the above, in the theme page template, we would have a link in the table cell such as: –

<a href="#fancyboxID-3" class="fancybox table-enquiry-buttons"></a>

So in the above, we are linking to the fancyboxID-3, which is added into the page and the classes add the button background image etc. The fancyboxID-3 is further done the page and is something like:

	<div style="display:none" class="fancybox-hidden">
		<div id="fancyboxID-3" class="hentry" style="width: 680px; max-width: 100%;">
			<h2>Product Enquiry</h2>	
			<?php gravity_form(32,false,false,false,'',true,80); ?>
		</div>
	</div>

You can see that the first div hides this form, the second div sets the id and some dimensions and the form is added using php.

I used this method mostly because this was the method we were using anyway, but note the important point, the form loads AFTER the click on the page. I am not sure how this would work if the form loads before the click.

Step 2

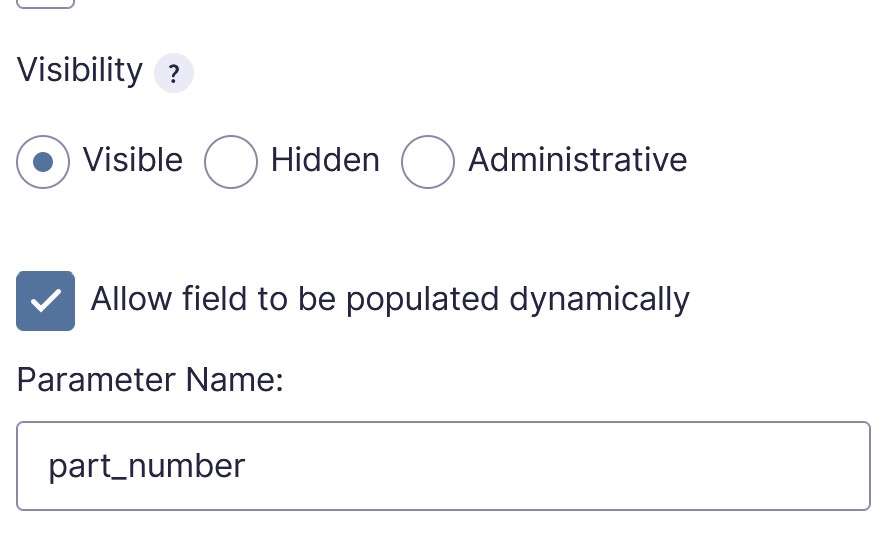
Once you have your form set up on the page and have built your form in Gravity Forms, the important thing to do is on the field where you want your page-loaded-data to show, you need to enable dynamic population. You do this by selecting the field, then in the sidebar, Advanced section, check “Allow Field to be Populated Dynamically”, then add your parameter name, which you can select. In my case I have called it “part_number”.

Step 3

So you are now all setup for some jQuery. There are various ways to add jQuery or javascript in general to the page. These include via a custom plugin or via javascript being loaded into the page elsewhere. I’m not going to cover enqueuing scripts here, but there are plenty of articles on how to do this.

In my case I actually had a few scripts already enqueued on this page, so I added my jQuery code to that.

The code to add is as follows: –

// This section adds the part number clicked on into the enquiry form
// Get part number from product table row click
jQuery('table.product tr').click(function() {
  var partno = jQuery(this).children('td:first-child').text();
  jQuery('#input_32_29').val(partno);
}); 

To Change

The first line of the code is to detect the click in the table row (note the form only shows on clicking the enquiry icon). In my case the table has a class of product hence “table.product.tr” if you have any other classes on your table, you can change that accordingly.

The second line of code sets the text you are going to extract from the line. In my case it’s the first table cell, so hence “td:first-child”.

Lastly the third line, the “#input_32_39” is the cell id of my particular form. You get this data from the form number (first number) and the second number (cell number) in Gravity Forms. You will need to change those to your particular form and cell number.

Note that you don’t seem to need to have the same value that you specified in Gravity forms as your parameter name. In my case I just have partno.

After these steps your form should automatically load the part number from the table line you clicked on.


Extracting Data from a variable in WordPress

This next section is a bit more complicated! We are going to extract data from am array in php and populate a multiselect field (you could do checkboxes instead) with any accessories that are listed by displaying this variable on the page. This relates more to the second Gravity Forms article above.

Note that this is populated into the form as the page is built, so doesn’t require settings in Gravity Forms itself. Note that this code is in the theme template file.

/ Start of section to add accessories to the intable non-specific form
		add_filter( 'gform_pre_render_32', 'populate_accessories' );
		add_filter( 'gform_pre_validation_32', 'populate_accessories' );
		add_filter( 'gform_pre_submission_filter_32', 'populate_accessories' );
		add_filter( 'gform_admin_pre_render_32', 'populate_accessories' );
		function populate_accessories( $form ) {
			foreach ( $form['fields'] as &$field ){
				if ( $field->type != 'multiselect' || strpos( $field->cssClass, 'populate-accessories' ) === false ) {
					continue;
				}

				global $tab_4_content1;
				$choices = array();
				$accextracts = array();

				
				$dom = new DOMDocument;
				$dom->loadHTML($tab_4_content1);
				foreach($dom->getElementsByTagName('li') as $node)
				{
					$accextracts[] = $dom->saveHTML($node);
				}
				
				if (empty($accextracts)) {
					echo "<style>li#field_32_30{display:none !important;}</style>";
				  }


				// Create the array from the line items in here. Save them into $choices created above
				foreach ($accextracts as $accextract) {
					$final = strip_tags($accextract);
					$choices[] = array( 
						'text' => $final, 
						'value' => $final 
					);
				}
		
				// update 'Select a Post' to whatever you'd like the instructive option to be
				$field->placeholder = 'Optional Accessories';
				$field->choices = $choices;
		
			}
			return $form;
		}
// End of section to add accessories to the intable non-specific form

I can’t pretend to follow all this code however, the following needs changing for your installation: –

add_filter( 'gform_pre_render_32', 'populate_accessories' );
add_filter( 'gform_pre_validation_32', 'populate_accessories' );
add_filter( 'gform_pre_submission_filter_32', 'populate_accessories' );
add_filter( 'gform_admin_pre_render_32', 'populate_accessories' );

This section includes the Gravity Forms ID. In my case this was 32, but you will need to add your form in.

if ( $field->type != 'multiselect' || strpos( $field->cssClass, 'populate-accessories' ) === false ) {
		continue;
			}

This section identifies the field you are going populate in the form. In my case it’s the multiselect field. NOTE that you need to pick a field type that isn’t used elsewhere on the form, otherwise it will fill all multiselects on the form and you’ll need to find another way to identify it. Essentially though this code is saying run this code only in that multiselect field.

global $tab_4_content1;
	$choices = array();
	$accextracts = array();
			
	$dom = new DOMDocument;
	$dom->loadHTML($tab_4_content1);
	foreach($dom->getElementsByTagName('li') as $node)
		{
			$accextracts[] = $dom->saveHTML($node);
		}
				
if (empty($accextracts)) {
	echo "<style>li#field_32_30{display:none !important;}</style>";
			}
// Create the array from the line items in here. Save them into $choices created above
		foreach ($accextracts as $accextract) {
			$final = strip_tags($accextract);
			$choices[] = array( 
				'text' => $final, 
				'value' => $final 
			);
		}

In this section we are extracting the $tab_4_content1 variable already loaded into php. In this case this contains an unordered list of the product accessories. You can see in this section I am extracting these elements. This may not be appropriate to your variable so I won’t go into that here.

// update 'Select a Post' to whatever you'd like the instructive option to be
		$field->placeholder = 'Optional Accessories';
		$field->choices = $choices;
			}
			return $form;
		}

This last section updates the placeholder etc and returns the form.

Result

You can see the result at https://www.brenclosures.com.au/products/ausrack-txd/. Click on the orange enquiry icons in the table to load the form. You will see that the product number of the line you click on is loaded as the Enclosure Selection and Accessories Available is filled with the accessories available in the accessories section on the page.

Note not all of the forms on this site use this system.

Filed Under: Uncategorized

Coronavirus Update – Work From Home Tools

March 26, 2020

There are a lot of different tools available to remain productive at home. These include: –

  • Microsoft Teams – https://teams.microsoft.com/downloads which now has a 60 day free trial
  • Zoho Remotely – https://www.zoho.com/remotely/ which also has a free trial period

If you want to collaborate on ideas etc, Microsoft Whiteboard – https://www.microsoft.com/en-au/p/microsoft-whiteboard/9mspc6mp8fm4?activetab=pivot:overviewtab might be the way to go.

For meetings etc a great option might be to use an iPad. You then then use Microsoft Whiteboard and Onenote and Facetime to video conference.

Filed Under: Uncategorized

Recent Posts

  • AliCloud (Aliyun) Server Crashes Fixed with the Help of Site24x7
  • S/MIME Certificate – Sectigo Usage
  • Cybersecurity for Australian Small/Micro Business – Networks 2 – DNS
  • Cybersecurity for Australian Small/Micro Business – Networks 1 – Routers
  • Cybersecurity for Australian Small/Micro Business – Mobile, Part 2

Advanced Help

Enter your code in here. You will need to contact me first for a code!

Simon Griffiths in San Francisco

Webxopt was formed in 2009 by Simon Griffiths, who was at the time working as the Marketing Manager of a medium sized company in the electrical industry. Simons background includes study of both … Read More

Awards – Graduate Certificate in Cybersecurity

Robina Town Centre - Webxopt

Webxopt Pty Ltd
PO Box 16
Robina Town Centre
QLD 4230, Australia

T 07 3103 3259
E info@webxopt.com
ABN: 24 624 264 951

© 2025 · Webxopt · Built on the Genesis Framework